How Many Wires for a 2-Stage Thermostat
Are you struggling to determine the number of wires required for your 2-stage thermostat? Don’t worry; you’re not alone. Many homeowners face this confusion when upgrading or installing a new thermostat system.
Here is the quick answer: a 2-stage thermostat contains 7 wires (R, G, W, Y, C, B/O, and AUX). While the process may seem difficult, understanding the correct wire configuration is crucial for efficient heating and cooling operations.
In this article, I’ll provide a clear and concise explanation of each of the wires of a 2-stage thermostat and explore the functionalities of thermostat wiring, helping you confidently tackle this task.
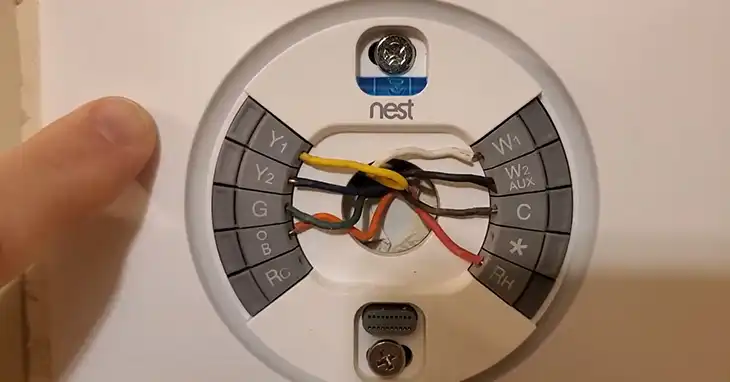
The Basics of Thermostat Wiring
Before learning specifics of thermostat wiring labels and color codes, it’s essential to understand the fundamental role that wiring plays in your HVAC system.
Your heating and cooling system needs instructions to know what to do. These instructions come from your thermostat through a set of wires. Think of them like a special language with just a few wires (4 or more) carrying the messages. The wires tell different parts of your system, like the furnace or air conditioner, to turn on or off depending on what you want (heat or cool). The more complex your system is, the more wires it might need to carry all the instructions.
Here’s a table with wire names, labels, colors, and their functions for thermostat wiring:
| Wire Name | Label | Color | Function | ||
| Power | R | Red | Supplies 24V power to the thermostat | ||
| Cooling Power | RC | Red | Connects thermostat to cooling system transformer | ||
| Heating Power | RH | Red | Connects thermostat to heating system transformer | ||
| Cooling | Y, Y1 | Yellow | Signals the air conditioner or heat pump to provide cooling | ||
| Second Stage Cooling | Y2 | Yellow | or | Light Blue | Signals second-stage cooling in a multi-stage system |
| Heating | W, W1 | White | Signals the furnace or heat pump to provide heating | ||
| Second Stage Heating | W2 | White | or | Brown | Signals second-stage heating in a multi-stage system |
| Fan | G | Green | Controls the HVAC system’s fan or blower | ||
| Common Wire | C | Black | or | Blue | Provides continuous power to smart thermostats |
| Reversing Valve | O/B | Orange | or | Blue | Controls the reversing valve in heat pump systems |
| Emergency Heat | E | No universal | Activates auxiliary or emergency heat | ||
| Auxiliary Heat | X/AUX | No universal | Controls auxiliary or second-stage heating | ||
| Outdoor Sensor | S | No universal | Connects to outdoor temperature sensors | ||
Note: some wires, like E (Emergency Heat), X/AUX (Auxiliary Heat), and S (Outdoor Sensor), may not have a universal color code, and their colors can vary depending on the manufacturer or installation.
2-Stage Thermostat Wiring
When it comes to HVAC systems with 2-stage heating or auxiliary (AUX) capabilities, a 7-wire thermostat setup is typically required. Each wire plays a crucial role in facilitating communication between the thermostat and the heating, ventilation, and air conditioning (HVAC) system.
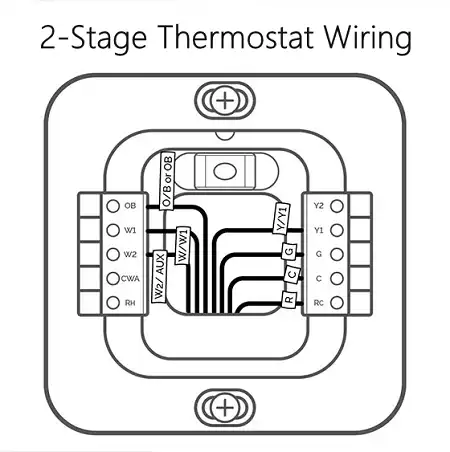
Let’s break down the function of each wire:
- Red (R) Wire: This wire is the lifeline of your HVAC system, responsible for delivering power to both heating and cooling components. It should be connected to the R terminal on the thermostat.
- Green (G) Wire: This wire is dedicated to controlling the HVAC system’s fan, ensuring proper air circulation throughout your home.
- White (W) Wire: Also known as the heating wire, this wire connects to the W or W1 terminal on the thermostat, enabling the first stage of heating.
- Yellow (Y) Wire: This wire is responsible for controlling the cooling or compressor function of your HVAC system. It should be connected to the Y terminal on the thermostat.
- Black or Blue (C) Wire: This wire, often referred to as the common wire, provides a continuous 24-volt power supply to smart thermostats, allowing them to utilize their advanced features and functions around the clock.
- Dark Blue (B) Wire or Orange (O) Wire: These wires play a crucial role in facilitating the changeover between heating and cooling modes. The dark blue wire connects to the B terminal, while the orange wire connects to the O terminal.
- White, Brown, or Light Blue (AUX) Wire: This wire is responsible for activating the second stage of heating in your home, providing additional warmth when needed. It should be connected to the X/AUX or W2 terminal on the thermostat. Typically, you’ll find either a white, brown, or light blue wire for this purpose, but never both colors simultaneously.
Conclusion
Understanding the correct wire configuration for a 2-stage thermostat is crucial for achieving optimal heating and cooling performance in your home. By following the 7-wire setup outlined in this guide and adhering to the manufacturer’s instructions, you can confidently tackle the installation process. If you have any further questions or need additional clarification, please feel free to leave a comment below. Thank you for reading this comprehensive guide. We hope it has provided you with valuable insights and empowered you to make informed decisions about your thermostat installation.
FAQs
What Is The Difference Between A 1-Stage And 2-Stage Thermostat?
A 1-stage thermostat operates your HVAC system at a single level, either fully on or off. In contrast, a 2-stage thermostat can operate your system at two different levels or stages, providing more precise temperature control and potentially improving energy efficiency.
Can I Use A 2-Stage Thermostat With A Single-Stage HVAC System?
While it is possible to use a 2-stage thermostat with a single-stage HVAC system, you will only be able to take advantage of the first-stage functionality. The second-stage capabilities of the thermostat will not be utilized, and you may not experience the potential energy savings or improved temperature control.
Can I Install A 2-Stage Thermostat Myself, Or Should I Hire A Professional?
While it is possible to install a 2-stage thermostat yourself if you have experience with electrical wiring and HVAC systems, it is generally recommended to hire a professional HVAC technician, especially if you are unsure about any aspect of the installation process. This can help ensure proper installation and avoid potential safety hazards or damage to your HVAC system.

